Lost Gold Explore Nosta Forest III: Difference between revisions
From Tears of Themis Wiki
imported>Harmonea (Created page with "{{Stage |gameMode=Event Stage |stageType=Story |name={{PAGENAME}} |previousStage=Lost Gold Explore Nosta Beach II |nextStage=Lost Gold Explore Nosta Forest IV |stageCost=None...") |
imported>Harmonea (rerun reward/unlock/new map) |
||
| (2 intermediate revisions by the same user not shown) | |||
| Line 1: | Line 1: | ||
{{Stage | {{Stage | ||
|gameMode=Event | |gameMode=Event | ||
|stageType=Story | |stageType=Story | ||
|name={{PAGENAME}} | |name={{PAGENAME}} | ||
|previousStage=Lost Gold Explore Nosta | |previousStage=Lost Gold Explore Nosta Forest II | ||
|nextStage=Lost Gold Explore Nosta Forest IV | |nextStage=Lost Gold Explore Nosta Forest IV | ||
|stageCost=None | |stageCost=None | ||
|description=Now and then, old houses can be spotted in between the trees and the meadows. What could be hiding inside them? | |description=Now and then, old houses can be spotted in between the trees and the meadows. What could be hiding inside them? | ||
|unlock={{Item icon|Emergency Medicine}} x175, {{Item icon|Lumber}} x175, {{Item icon|MRE}} x175, {{Item icon|Drinking Water}} x175 | |firstClearReward={{Currency|Astral Memory}} x20 | ||
|originalFirstClear={{Currency|Hunter's Badge}} x50 | |||
|unlock={{Item icon|Emergency Medicine}} x80, {{Item icon|Lumber}} x80, {{Item icon|MRE}} x80, {{Item icon|Drinking Water}} x80 | |||
|originalUnlock={{Item icon|Emergency Medicine}} x175, {{Item icon|Lumber}} x175, {{Item icon|MRE}} x175, {{Item icon|Drinking Water}} x175 | |||
|guide= | |guide= | ||
===Map=== | ===Map=== | ||
Points of interest: | Points of interest: | ||
* | * Supply box ({{Item icon|Universal Part}} x1, {{Item icon|Emergency Medicine}} x125, {{Item icon|Lumber}} x125, {{Item icon|MRE}} x125, {{Item icon|Drinking Water}} x125 [formerly {{Item icon|Universal Part}} x1 only]) | ||
[[File:Lost Gold Explore Nosta Forest III map.png|500px]] | |||
}} | }} | ||
Latest revision as of 09:20, 4 June 2022
Lost Gold Explore Nosta Forest III
Story Stage
Overview
- Now and then, old houses can be spotted in between the trees and the meadows. What could be hiding inside them?
- Stage Cost: None
- First Clear Rewards:
 Astral Memory x20
- Unlock Condition:
 Emergency Medicine x80,
  Lumber x80,
  MRE x80,
  Drinking Water x80
 - Note - During its initial limited run, this stage's first clear reward was:
 Hunter's Badge x50
 - Note - During its initial limited run, this stage's unlock condition was:
 Emergency Medicine x175,
  Lumber x175,
  MRE x175,
  Drinking Water x175
Guide
- Hover to view spoiler content.
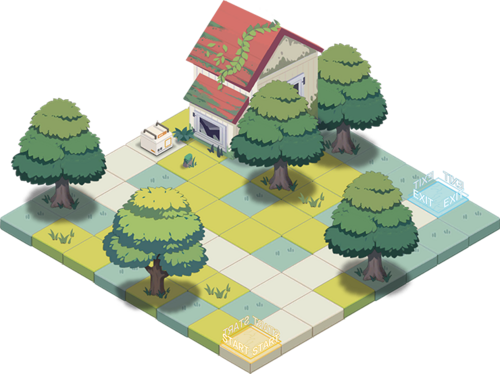
Map
Points of interest:
- Supply box (
 Universal Part x1,
  Emergency Medicine x125,
  Lumber x125,
  MRE x125,
  Drinking Water x125 [formerly
  Universal Part x1 only])

