User:Harmonea/Texture Ripping Guide
Important Note
The purpose of this guide is to help other wiki editors learn to rip clean textures from the game in the way I do. There is very likely little to no risk to your ToT account inherent to this process. All you're doing is reading the textures that are currently loaded into your own PC's RAM, and no publisher or dev can legally prevent this. No editing of game files is taking place, nor any access of files that should be inaccessible (i.e. datamining), nor any strange server request activity that could be tracked or noticed by HoYoverse. However, please be sensible about how you use this tool; remember that HoYoverse owns all legal and monetary rights to its games' assets, including the textures you'll find through this process. Follow the TOS and do not distribute it outside HoYoverse-controlled platforms (such as Hoyolab) or HoYoverse-affiliated platforms (such as our wiki). Violation of TOS and disrespect of HoYoverse's intellectual property could pose a risk to your ToT account, and neither the wiki nor myself will be responsible for such consequences.
Required Software
For this guide, you'll require a PC and three pieces of software:
- A ripper that can hook into programs on your PC and extract all textures that are currently loaded into memory
- I use NinjaRipper (link). This used to be free software, but versions 2.0 and above are paid and downloaded through the author's Patreon. While the final version 1.x was once upon a time verified to work with Mumu emulator version 2.25.2 by wiki admin Elaeagnifolia, I was not able to find a copy of that version of Mumu to download, nor was I able to get NinjaRipper 1.x working on any more up-to-date emulator. Therefore, I do use the paid 2.x version of NinjaRipper, and this guide will focus on instructions specific to a 2.x version of this software. I'm currently not aware of alternatives to NR. Note that a Patreon subscription is not required for continuous use of the software; if you cancel your subscription, you retain the ability to use the version of NR that you downloaded, you simply won't receive updates.
- An emulator that runs Tears of Themis on your PC
- I use Nox (link) but specifically version 7.0.1.3 at the NR devs' suggestion. While there are newer versions of Nox available, I'm very hesitant to upgrade after the difficulty finding an emulator that NR could play well with, so while other versions should theoretically work, I can't verify anything outside that version. This guide assumes you have already set up your emulator, installed Tears of Themis, and verified it will run.
- An image editor that can (a) open DDS format textures and (b) save PNG images with transparency.
- I use Adobe Photoshop. Photoshop isn't ideal for this purpose if this is your first need for heavier image editors due to that software's price tag. If you already have it, great, but otherwise free software like GIMP (link) would be a better fit. Note that many image editors, including Photoshop and GIMP, will require a free plugin to work with DDS files (for Photoshop, this plugin is "Nvidia Texture Tools"); this guide will not cover that, so please search for information about how to set your editor up on your own before continuing with the guide.
Setup (to be done once)
- Launch your emulator and set it to render using DirectX.
- Close your emulator.
- Set up NinjaRipper to work with your emulator by copying
d3d11.dllfromNinjaRipper\bin64\wrapperdirectory to your emulator directory (For Nox, find its install folder -- defaultC:\Program Files (x86)\Bignox-- and drop the dll file into theBigNoxVM\RT) subfolder.[1] - Launch NinjaRipper.
- Open NR settings; choose your output directory, a "ForcedRip" keybind, and ensure "Compatibility mode" is checked.
- Fill in the main NR window such that it can launch and "read" your emulator as follows. You may leave your Command line arguments section blank; my settings below simply automatically select a Nox instance with
-clone:Nox_0(only applicable if you have multiple instances set up) and automatically launch Tears of Themis with-startPackage:com.miHoYo.tot.glb.


Process (to be done each time) with example
- Launch your emulator by pressing the Launch button inside NinjaRipper - this allows NR to hook into your emulator and listen to what your emulator is putting into RAM.
- Start Tears of Themis and navigate to any part of the game that's displaying an image you'd like to rip a clean copy of. For our example, let's say we want the blueprint icons from the most recent furnishing event, Adventure Home Day, so I will navigate to the NXX Lounge store where these are being displayed.
- Press your NR "ForcedRip" keybind, wait a few seconds, then press it once again.
- Between the two key presses, your emulator will freeze, and NR will continuously dump textures into its output folder. You need to allow sufficient time for it to find and dump everything. No more than 3-5 seconds should be necessary.
- Recommended, but not required: exit your emulator.
- The reason for this recommendation is that due to NR's "Compatibility mode," many "garbage" folders will be generated inside the NR Output directory while NR is listening to your emulator. Windows is not good with handling large amounts of tiny files, so I find it convenient to minimize time spent creating and later deleting these folders and the small log files within them.
- Press the "Open RIP dir" button inside NR, or manually navigate to your output dir in Explorer if it tickles you.
- Look at that! An entire mess! But only one of these folders will have your ripped textures. If you're using Nox, it's the folder with the "NoxVMHandle" label, so open that. Inside that folder will be a subfolder for every frame you ripped (e.g.
frame_0,frame_1) containing your textures as DDS format images. - The DDS files rip upside-down, so open each one you want to save in your image editor, flip them vertically, and save as a PNG to preserve any transparency in the texture.


Texture Types
Easy: Single images
Many of the texture files we use on ToT are static, single images, such as:
- Category:Card icons - rip from the support deck or your friend list
- Category:Card preview images - rip from the archive accessible from your user profile
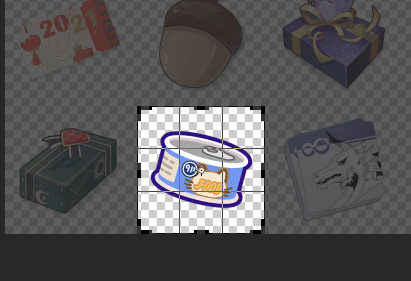
- Category:Currency icons - rip from the shop for which that currency is used, or from any achievement or mall pack awarding that currency (as you see in the guide image above,
 Home Deco Voucher and
  Exquisite Lumber icons ripped with the blueprints)
 - MOST, but not all, Category:Item icons - rip from any achievement, mall pack, or shop awarding that item
- Category:Pack banners - rip from the mall page showing that pack
- Category:Event images - rip from the event screen displaying the UI for that image
- Category:Character icons - rip from dialogue history windows and some battle screens
- Category:Namecard images, Category:Visit BG images, Category:Visit outfit images, Category:Illustration images, Category:Location images, etc.
Medium: Some assembly required
However, some textures are exceptions.
- Category:Badge icons and SOME Category:Item icons, particularly those associated with events, come out as a sheet of many textures. You will have to extract the desired texture from the sheet. Note that these "sheets" contain badges and event items that are not yet implemented on global, so please do not share them.
- The badge sheet is a series of 154x154 images with an 8-pixel "dead zone" border between each texture that should not be included.
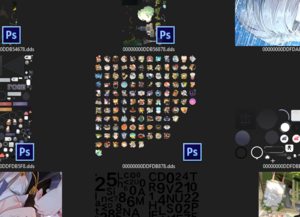
- The event items sheet is a series of multiple-sized textures; for the wiki, please use the ones that are 256x256. These also have an 8-pixel border between them on every side, so please trim accordingly (for example, to trim out the second image here, I crop out a 256x256 section starting from pixel 256+8=264.
- The badge sheet is a series of 154x154 images with an 8-pixel "dead zone" border between each texture that should not be included.
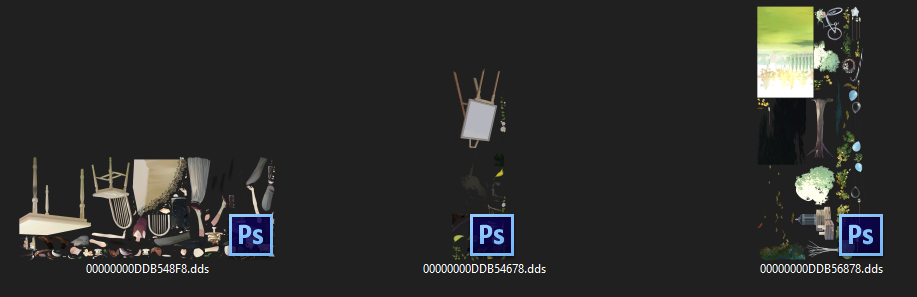
- Category:Character sprites for NPC characters (not the male leads) come out as separate parts for head (in fact, multiple heads with various expressions that are swapped around by the game) and a static body. You will have to edit them back together. Please do so very carefully, maintaining an image as close to in-game accuracy as possible. Note that I already have a full gallery of all NPCs used in the current game version, so feel free to spare yourself this tedious work as I will happily add any missing image to a new character page, but if you'd like to create your own anyway, I ask that you please be as picky about being faithful to HoYoverse's work as I am. ^^;
- RPG maps come out in individual tile sprites that must be reassembled manually. Those who are interested in this tedious/ambitious process may care to learn a tilemap editor such as Tiled (my choice). That is outside the scope of this guide.
- For example, Artem's home theater:
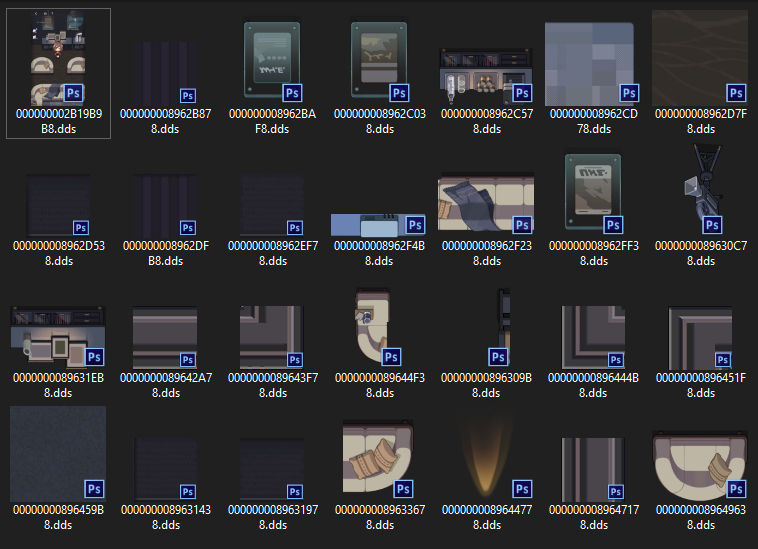 .
.
- For example, Artem's home theater:


Hard: Unreasonable expectations
And some textures simply cannot be ripped effectively. Screenshots will suffice for the wiki's purposes.
- Any moving, Live2D image such as card art and invitations, comes out as a jumble of pieces that, while possible to reassemble with careful editing, is simply too much to ask of an editor.
- For example, the Autumn Light invitation:
- For example, the Autumn Light invitation:
- Male lead sprites, due to their numerous expressions and animated mouth movements, use a different display system from NPCs' two-part static images. They come out in a single texture sheet that contains all of the pieces (eyes, brows, mouths, shadows, etc) that can compose every expression they can make, with no information about how to reassemble it. While it's likely possible for a very diligent and observant fan, this again is too much to ask of an editor, and there's risk that any potential error could misrepresent HoYoverse's vision for their assets.
- For example, Vyn's "Misty" (Bakerlon) sprite:
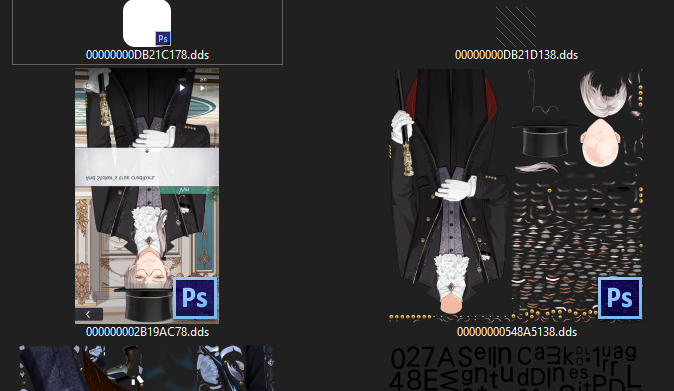
- For example, Vyn's "Misty" (Bakerlon) sprite:

Questions?
Please leave questions, comments, or suggestions for this guide on the guide talk page, or find me on the wiki's discord as @harmonea.